User Guide
Introduction
This allows you to instantly post invoices and credit notes directly to Xero.
Feature Control
PMS Options
Access to this feature will be controlled through a new PMS option. The option is labelled “Xero Customer Invoicing” and can be activated through the Plan Details & Support Contact link on the account details page. Please click here for more information about account plan changes. If you need help accessing it please contact Seekom support.
Initial Setup
To connect iBex account to Xero, simply login to iBex and click 'Xero Configuration' (under the menu header Finance). The first step is to enable the connection by entering the values below:
- Consumer Key: TB43WNKRQLEVSJ0Z44A2G3GFT5TKHR
- Consumer Secret: KW1CLU3S3SJCG49LQMQFIWCZGKGAYF
Save and authenticate with Xero to authorize the connection between iBex and your Xero organisation. This will open the Xero website and prompt you to login if you do not already have an active session. You then have the option to authorise to allow access for 30 minutes which will return you to iBex’ Xero configuration screen.
Map Agents, Companies, Customers and Account Codes
In this section you set up the links between iBex agents / iBex customers and Xero Customer accounts that are valid for an invoice transaction. Extras items can be linked to Xero account codes set to account type “Revenue”.
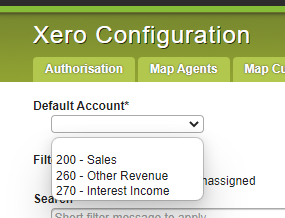
Select a Default Account Code for Customers and Account Codes from the list of Xero accounts. The default Xero contact for customers is optional and, if set, will be used for any Customers not explicitly mapped to a contact.The default Account Code however is required and is used for room reservations as well as any extras that have not been explicitly mapped.
If you add a new account in Xero and need to update the list then you can use the grey refresh link at the bottom of the list.
Create a new linked Xero Contact
The Xero configuration screen "Agents" and "Customers" tabs have a 'Create Contact' column and unmapped agents / customers have a checkbox in this column. When the 'Create Contact' option is ticked, you can add a new contact in Xero by exporting customer/agent details from iBex, the new Xero contact is automatically linked to the existing Agent in iBex.
|
Note: Multiple agents / customers that have identical names in iBex will be mapped to a single Contact in Xero, this is a Xero restriction where it will not create multiple Contacts with the same name.
|
Please note: Company mapping will come under "Map Agents" . If you click on this tab, you will be able to see all companies and agents in your account ready for mapping.
Integration
The integration creates invoices and credit notes in Xero using the invoice number from iBex. When the Xero integration is enabled the Issue (end email) Invoice actions are no longer available as these functions should be performed within Xero. Instead, the Issue action creates an authorised invoice in Xero for the organisation’s linked contact using the invoice number, invoice date, due date and booking reference number.
The following 3 screenshots show an example invoice in iBex, and how it appears in Xero:
A) Below is creating an Invoice in iBex
B) When you click "issue" this will then transition the button to "Xero" in which indicates that this has successfully linked to Xero.
C) Below is what it looks like in Xero.
Linked Invoices
When an invoice or credit has been linked to Xero, the Invoices report includes a Xero Invoice icon (X).
Select the Issue button in the Invoices report to link all non-issued invoices (L) displayed in this report.
Sync Payments
Reconciled payments in Xero can be applied to individual invoices:
1. First retrieve the invoice.
2. Click on the Invoice number to go into the invoice details
3. Click the Payment button and the payment screen will pop up (as shown below)
4. Select Xero to load all payments loaded in Xero for this Invoice.
Apply Xero payments to all linked invoices using the Invoices report in iBex: (select "Payments" "OK")
Adding Codes to Xero Interface
In general, we only have 3 Codes push through as default

If you login to your Xero account and select "Accounting" > Click "Chart of accounts" . (see below)

Select the code you wish to push over to iBex. In the below example we are am using code 310. Where it is highlighted "Account Type" , use the drop box to select either Sales, Other Revenue or Interest Income. (image below)

(Image B) Below I have added this as a Sale

This will then save set up and should display as follows

Go back to your iBex system and click on Xero Configuration and select the "Map Extra Categories" tab. Scroll to the bottom and click "Refresh" (image below)

By refreshing this page, it should pull your code through and be included on the drop-down menu (as seen below).


Comments
0 comments
Please sign in to leave a comment.